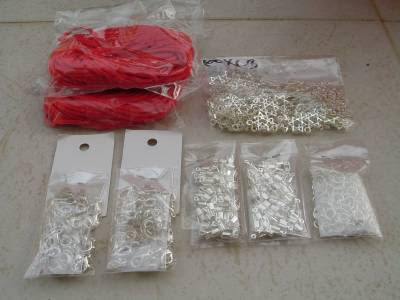
Tuesday, March 18, 2008

How to Grow Grass in the Air - Hanging Greenhouse

How to Grow Grass in the Air - Hanging Greenhouse


The Kit contains:

1) A plastic mini transparent greenhouse (18cm long)
2) Cotton wool
3) Cord (for hanging)
4) Grass seeds
5) Butterfly stickers


Soak the cotton wool with water1) Soak the cotton wool with water. Sprinkle grass seeds on the soaked wool. Place it in the bottom one half of the greenhouse.


Close the two halves of the greenhouse together2) Close the two halves of the greenhouse together. No glue needed - It snaps shut.


Tie one end of the cord into the hole at the top part of the greenhouse3) Tie one end of the cord into the hole at the top part of the greenhouse (You don't have to make a fancy knot like in the picture. A simple knot will do).


Stick the butterfly stickers on the greenhouse. 4) Stick the butterfly stickers on the greenhouse.


Hang the greenhouse near a window5) Hang the greenhouse near a window. In one week the grass would start growing.


Monday, March 17, 2008

Project 2: How to make 100 Kabbalah Bracelets

Project 2: How to make 100 Kabbalah Bracelets


The kit includes :
1) 20 meters red silk cord
2) 200 rings
3) 200 caps
4) 100 crab locks
5) 100 Star of Davids

Instructions:

Measure and cut off 17cm of red cord
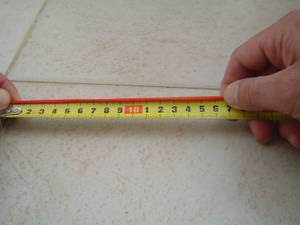
1) Measure and cut off 17cm of red cord. This should fit a man's arm. For women I recommend 15-16 cm.


Put one end of the cord into the cap2) Put one end of the cord into the cap, in between the two flaps.


Use long-nose pliers to squeeze one of the flaps into a 45 degree angle3) Use long-nose pliers to squeeze one of the flaps into a 45 degree angle. Repeat for the second flap. You will end up having the flaps form a triangle.


Now close it shut by giving it a good squeeze in the middle with the pliers
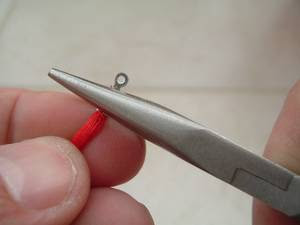
4) Now close it shut by giving it a good squeeze in the middle with the pliers.


This is what it should look like after squeezed
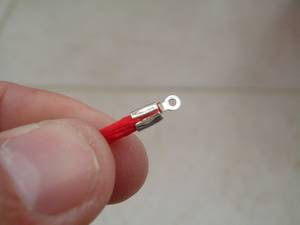
5) This is what it should look like after squeezed. It's nice and strong. There is no way the cord can escape from this cap now, even if you give it a good pull. This part has to be done well. If not strong it can result in the bracelet ripping apart while worn. And We don't want that to happen... Repeat for the other end of the cord.


Put a ring through the little hole in the cap and into the ring also put a crab lock6) Put a ring through the little hole in the cap and into the ring also put a crab lock. Close the ring shut using the pliers.


Repeat step 6 for the other end of the cord7) Repeat step 6 for the other end of the cord, but this time put a Star of David instead of a crab.
Once you have done this, the bracelet is ready. To close it, the crab will lock on this ring below the Star of David.
Now that you are an expert in this you can repeat it 100 times. Good Luck !


Sunday, March 16, 2008

Project 1: How to make a Mozaic Mezuzah

Project 1: How to make a Mozaic Mezuzah


The Kit contains:

1) A plaster mezuzah (10cm long)
2) An imitation scroll (photocopy)
3) A tube of Superglue
4) 2 wooden stirring sticks
5) A small cup of acrylic glue
6) A small cup of white cement
5) A small measuring cup (not shown in picture)

Instructio
ns:

Use the wooden stick to smear a layer (about 0.5 cm thick) of acrylic glue on the front side of the mezuzah1) Use the wooden stick to smear a layer (about 0.5 cm thick) of acrylic glue on the front side of the mezuzah, as if you were spreading cheese on bread. (The front side of the mezuzah is smooth and the back side of the mezuzah has a cavity for the scroll). The acrylic glue is the brownish pasty substance in one of the small cups.


Press the three mozaic tiles (smooth side up) into the glue2) Press the three mozaic tiles (smooth side up) into the glue. You can also use a hammer to brake the tiles into smaller pieces before gluing them into the mezuzah. Use the wooden stick to smooth out the edges. Let dry for 24 hours.


Now we want to apply white cement between the tiles and on the edges3) Now we want to apply white cement between the tiles and on the edges. The cement is the white powder in one of the small cups. You will have to add a little bit of water to it and stir until it's ready. But this is a tricky part because if you add too much water, the cement will be too watery and no good. If you don't put enough water, it will be too clumpy. Your cement needs to be pasty like toothpaste. So follow the instructions carefully:
Fill the measuring cup with water to the level marked by a black line (please be exact!). Use the tip of the wooden stick to add a bit of the cement powder into your measuring cup. Stir. Add a bit more powder. Stir. Keep doing this until you get a nice smooth paste. Now use the stick to apply the paste between the tiles, the gaps, and on the sides of the mezuzah. Use a damp cloth to clean the tiles smooth.

Use the Superglue to glue the Shin onto one of the tiles4) Use the Superglue to glue the Shin onto one of the tiles. Let dry for a few seconds. Don't let it touch your skin.


Roll the scroll tightly around a pencil or a pen.5) Roll the scroll tightly around a pencil or a pen.


Once the scroll is tightly wound around the pencil, use some sticky tape to close it6) Once the scroll is tightly wound around the pencil, use some sticky tape to close it.


Take out the pencil and put the scroll in the cavity at the back of the mezuzah.8) Take out the pencil and put the scroll in the cavity at the back of the mezuzah.


Now your mezuzah is ready to be stuck to the door post9) Now your mezuzah is ready to be stuck to the door post. To stick it, peel off the cover of the double sided tape on the back of the mezuzah.


Congratulations ! Your'e done !